Riding Blog

This weblog at mikeuhl.com is the personal web site of Michael "Mike" Uhl. Entries to this weblog and web site represent my personal opinions. The site is not owned, operated, or affiliated with my employer or any organizations other than those owned and operated by Mike Uhl.

Photo (right): That's Lisa and me stopped along US 550, "The Million Dollar Highway," in southwest Colorado on our way north into Silverton, July 2017. 

Entries are copyright (c) Michael A. Uhl, as of date of posting.

You are welcome and encouraged to participate in the discussion on this site. Comments are owned by the poster. I reserve the right to remove any irrelevant, inflammatory, or otherwise inappropriate comments. Questions may be directed to me using the "Post a Comment" feature available on every blog page.

FYI: I ride a 2015 Harley-Davidson FLHTK Ultra Limited Special Edition.

Thank you and please enjoy my site!

Monday
Sep162013

Fuel pressure regulator kills the joy (and the engine)

I finally got my bike back from Rommel's Harley Davidson in Durham last Friday.* They had it almost three weeks since it died along I540 on Sunday, August 25.

On Sunday the 25th, I had just gotten on the highway at NC55 and was headed to my friend Mike Russo's house in Cary off Harrison Avenue when the engine suddenly quit. I coasted over to the side of the road wondering what could have caused such a sudden end to my ride. I was a very unhappy camper. It's been such a frustrating year with this bike. More than once I have found myself thinking of going to the Honda dealership in Durham and going over to the Dark Side.

I called Mike and told him what had happened. He suggested I check my fuses, which I had planned to do anyway given my experience earlier this year. I checked them and they were all fine. I called him back and described the symptoms--the starter was turning the engine over but the engine wouldn't start--and he asked me if I had gas. I did, but it was a good question to ask because the way the bike was behaving, it was as if I had run out.

Mike arrived in about 20 minutes pulling is covered motorcycle trailer. It was only about 4:00 p.m. and he remembered that the dealership in Durham now had Sunday hours. I called, and sure enough, Rommel's HD was open. So we took the bike straight there.

The friendly but remarkably slow service people at Rommel's ordered the parts my bike needed in serial order rather than all at once, thus extending what should have been a 3-5 business day process out to almost three calendar weeks...all during some of the best weather we've had this year. But I digress.

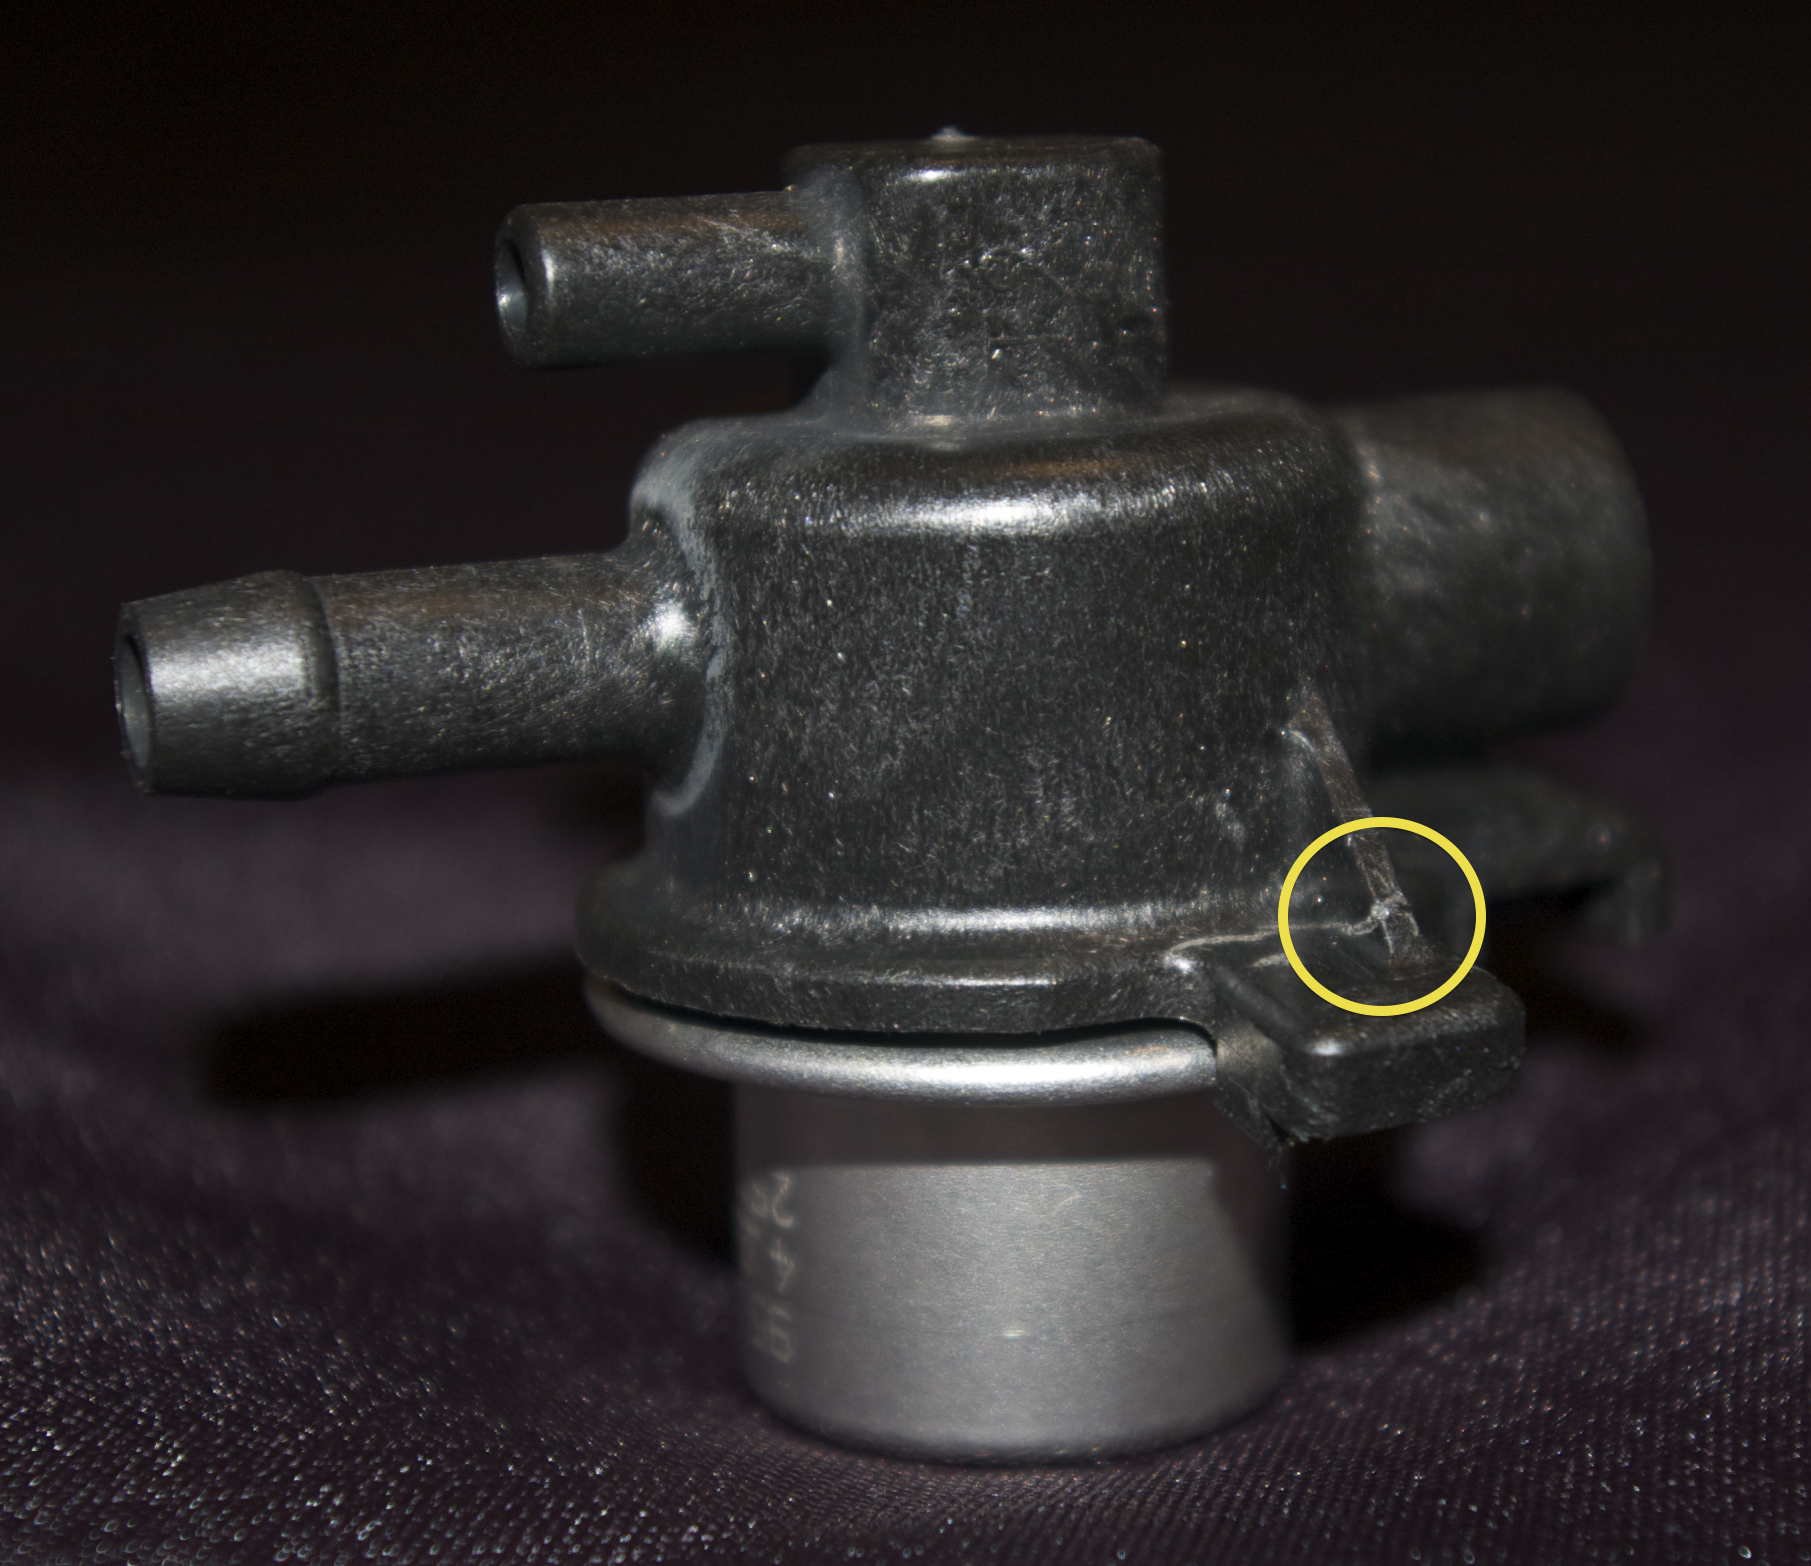
It turns out that what stopped my bike cold on I540 near I40 was a cracked fuel regulator housing (HD Part No. 62373-01), $17.99. The fuel pressure regulator itself (HD Part No. 27408-01, $39.99) was also suspect, so the Rommel's HD mechanic ("tech") changed that out too. In the photos I've included, the black plastic part is the housing and the smaller metallic object, which fits into the housing, is the pressure regulator itself.

I am surpsised they didn't change out the fuel filter while they were under the gas tank. Apparently, the fuel pump looked fine, so they didn't change that. There was another 2006 Electra Glide there at the same time as mine. It had over 100,000 miles on it and its fuel pump had failed. (My bike has 87,700 miles on it right now.) I now know to monitor the condition of the fuel pump over the next year or two.

Before they diagnosed the fuel pressure regulator as the culprit, they thought the air intake seals (HD Part No. 26995-86B, 2 x $2.99 each) might be at least part of the problem. They probably needed replacement anyway, but they did not have any apparent effect on how well my bike runs.

I rode to Hendersonville and Asheville over this past weekend (September 14-15) without any major problems. Altough I did notice that either my oil pressure gauge or my oil pump is going. The needle on the pressure gauge will, for no apparent reason, repeatedly dropped to just above 0, even at 3,000 RPM. Then, again for no apparent reason, the needle would move back up to a more normal reading.

Next month I plan to replace my broken oil temperature gauge and at the same time, I will try a new oil pressure gauge and hope that's the problem, rather than the oil pump. I'd rather not tear the engine apart just to replace the oil pump.

I'd like to thank my friend Mike Russo for bringing his trailer out to the side of the road and rescuing me and my old girl.


*P.S. I've given up on the service department at the Harley dealership in Raleigh. They've lied to me and insulted me more than I care to tolerate. Oh, and they do a piss-poor job of actually making the repairs--if they bother to make them at all.

Sunday
Jul072013

Don't assume there's a connection...

Tuesday, June 25, 2013, 0700: I had my bike packed to the max with a tent, sleeping bag, clothes, bike cover, etc. and I rode off on what was supposed to be a nine-day, 3,000-mile tour of New York and Maine with a stop in Rhode Island to see a friend in Cranston.

I got about 20 miles into the ride when my turn signal indicators stopped working. However, I did notice from the reflection off a vehicle in front of me that my actual turn signal lights were functioning properly. Just for kicks, I tried my horn to see if there was a problem with my handlebar switches.

No horn, not a peep. So, I turned around and hastily threw my bags into the Jeep. After some basic maintenance on the Jeep, including a new air filter and a bottle of fuel injector cleaner, I drove north in my cage--deeply frustrated with my bike.

First, the horn

I couldn't resist the pun in the title of this blog post: the reason my horn stopped working was a broken power wire and had nothing to do with my turn signals. I also recently blew a fuse (as I wrote in my last blog post) and my turn signal indicators on the dash stopped working the week prior to my trip.

I had to remind myself that just because these problems all seemed to happen at once, I should be careful not to assume they are related. Keep that in mind when you encounter multiple problems at the same time, even multiple electrical problems.

I confess I don't use my horn much so I actually had no idea how long it had been out. Yes, I'm supposed to check my horn each time I ride in my T-CLOCK pre-ride checklist. However, I'm not a big horn user on the bike or in my Jeep. The last time I had the bike inspected was last September and that's the last time I know the horn worked. Fortunately, the horn problem became apparent quickly as I could feel the break in the wire inside the insulation. I was able to easily pull off the connector and a quarter-inch of black plastic insulation with it. The metal wire had broken completely.

A very helpful fellow at the parts counter at Ray Price Harley Davidson actually gave me the butt connector I needed to splice onto the end of the wire just upstream of the break. Refer to the picture above right. You can see the yellow connector I crimped onto the original wire.

It's an air horn, so I needed to run the engine for a little while so the compressor could build up enough air pressure to make some sound.

The other problems

I do not know for sure what cause the 15 amp Battery fuse to blow, but I suspect the Street Magic Load Equalizer (see photo at left). But I may never know what caused it. With almost 85,000 miles on the bike, it might have simply been metal fatigue.

I removed the load equalizer it from my bike and the turn signal indicators are once more working reliably. All of my other lights seem to be working fine so I can only conclude that I purchased a $70 part I did not need, at least at this time. Perhaps it will prove useful when I add more LEDs to my bike.

The good news

I tried a new route north on this latest trip and if I had been on the bike, I would have been unhappy under two circumstances:

  1. Stop-and-go traffic (with a lot of stop) on I95 and I495 near Washington, D.C. in 95°F heat, and
  2. A severe thunderstorm in west-central Pennsylvania near Philipsburg.

Next time I take the bike north, I'm going the traditional way: I40-US52-I77-US19-I79-I90. Just because a route looks good on a map, does not make it a good route on an air-cooled motorcycle!

Keep the shiny side up!

The Long Rider


P.S. Special thanks to my future son-in-law Christian Lloyd McDonald for his help with the photos used in this blog post.

Sunday
Jun232013

When a fuse stops you from going anywhere

Not all fuses are created equal. On my Harley-Davidson Electra Glide I learned last week that a single burned out fuse can prevent you from starting the bike. It's labeled "Battery" in the main fuse block and it's a show-stopper.

I was riding back from Burlington, NC last Friday with my wife on the back and noticed that my turn signals suddenly stopped working. Since I recently installed LEDs and a load balancer I figured it was related to one of these new components. Nope. I checked the lights and they all looked fine.

No big deal. Since I got the new spark plug wires last week the bike has been running great. I figured I'd just use hand signals and figure out the problem over the weekend.

I dropped my wife off at home and went into work. When I came out of work to ride home on a beautiful Friday evening, the bike's starter didn't make a peep when I pressed the start button. WTF!

A couple of co-workers joined me in the parking lot to mull over the situation and I had my wife bring me a voltmeter and jumper cables. The battery tested fine. The problem was clearly electrical--as in catastrophic failure somewhere--so I went for the main fuse block next.

The main fuse block is mounted behind the Maxi-Fuse unit under the left side cover. (See photo at right.) The Maxi-Fuse and main fuse block are both located just beneath the electronic cruise control module.

While I'm here I have to tell you a little story about how ignorant dealer "technicians" can be. A few years ago I was having trouble with my cruise control. When I took it to the local dealership they called me and told me that the technician couldn't work on it because I had installed an after-market cruise control module. I would have to purchase a new HD cruise control module. Take a look at the picture. (Click on it to display a larger version.) Just to be clear, the electronic control cruise module is the plastic box with the bright orange sticker on it - the one with the Harley-Davidson logo and part number 70955-04 printed on it!

(By the way, it turns out that the source of the cruise control problem was the throttle cables were being pulled too tightly on the new handlebars I had installed. The cruise control switch couldn't release properly. Installing longer throttle cables solved the problem.)

You slide the Maxi-Fuse sideways to remove it to access the main fuse block. Carefully pull the fuse block straight out away from the bike and you can then read the fuse layout. (Refer to the photo, left.)

Note that on the left end of the cover is a place to keep spare fuses. I'm glad that was there, with a spare 15 amp fuse when I needed it.

The fuse block cover pops off in an upward direction. Be sure to remove and replace fuses one at a time in order to simplify the process of putting the correct fuse in the correct slot. On my bike, not all slots are occupied.

After pulling and examining several of the fuses--using my LeatherMan tool needle nose plyers I keep on my belt--I found the cuplrit: third column from the left, third up from the bottom. The cover (and the maintenance manual) lists it as the "Battery" fuse. Click on the photo to the right to display a larger image with the cuplrit fuse circled.

I replaced it and the bike started right up. I rode it to Rockingham ("The Rock") yesterday and encountered no problems--other than rain. :-)

So, why did the "Battery" fuse go; was it just its time, or is there a more deeply embedded problem somewhere? For example, is there a wire under the seat, just off the battery, that shorted somehow when Sam (my wife) got on for our ride to Burlington?

Of course, I will let you know if any new problems develop. I'm riding to Machias, Maine and other points north on Tuesday (June 25), so I will have a good opportunity to see whether or not the bike is functioning properly. 

As always, keep the shiny side up!

-The Long Rider 


Wednesday
Jun192013

Worn spark plug wire was causing my engine problem

ohm meter with spark plug wiresLast year the problem first revealed itself when I was riding in Florida, on my way to Key West: I started experiencing engine hesitation (misfiring), especially when accelerating. Wet conditions seemed to make the problem worse.  In hindsight, I realize that wind also aggravated the problem.

As I wrote in an earlier blog post, Jimmy at J&D Cycles in Morrisville, NC discovered a broken air filter bracket when I got back from Key West. I thought that was the source of the problem. (Wrong.)

As you also may have read in a previous blog post, I tried throttle body cleaner, thinking that restricted air intake was the source of the problem. Nope. I then changed the spark plugs. Nope again.

Two weeks ago, I took the bike into the local dealership for a Dyno Tune. On my previous bike, a 2000 HD Road King Classic (FLHRCI), I had a problem with similar symptoms. In that case, I had had the dealer install the Screamin' Eagle® Big Bore Stage II Kit. When they did that, they failed to remove my Power Commander, which was no longer needed because the dealer's upgrade included a new Electronic Control Module (ECM). The Power Commander was interfering with the settings of the new ECM, throwing my ignition timing off. An old fella at the HD dealership in Johnston City, Tennessee happened to be chatting with me one afternoon when I was riding out that way. I mentioned my problem to him and after sharing some details, he barked at me, "take that damned thing off" - referring to the Power Commander. "You don't need it with the new ECM!" He was absolutely right. I removed the Power Commander and the timing problem went away with it.

I have a Power Commander on this bike, but with the stock ECM. So, I thought may a tuneup would fix the problem. That is, I thought that if the dealer adjusted the map on my Power Commander to match my current set up, the timing problem I thought I was having would be resolved. Nope again.

The Dyno Tune improved the engine performance somewhat, but the hesitation problem remained. How they missed the actual source of the problem during the three-hour Dyno Tune mystifies me. (I will write in another blog post how a $300 tune ended up costing me $860.) 

So, a couple of weeks ago, I went back to Jimmy, desperate to find the source. I'm riding next Tuesday to Machias, Maine and the Adirondacks for a 10-day tour and I need my bike in optimum condition.

We ran down a checklist of potential sources for problem and decided to go for new spark plug wires next. They cost me $20.95 for the pair. I picked up the bike today. After more than a year of trying this and trying that, we finally discovered that the engine hesitation problem was resulting from a leaking spark plug wire!

(Click on the photo of the spark plug wires, above right, to view a closeup of the hole in the upper wire.)

It turns out that one of the wires was rubbing against a metal edge on the engine and after 70-80,000 miles, the vibrating surfaces had worn a hole right through the insulation.

Just for geeky fun, I got my ohmmeter out and checked the resistance on both wires. One was about 6.8 Kohms (see photo) and the other about 6.4 Kohms. The official Harley Davidson maintenance manual (Part No. 99483-06) specifies a resistance of 5 - 11.667 Kohms. So, these wires were still in spec--when the one wasn't leaking a charge to the engine surface. Only a visual inspection of the wires would reveal the source of the problem.

I am now ready to ride to Maine next week. Amen!

Keep the shiny side up!

-The Long Rider

Sunday
Jun022013

Upgrading to LED lights

Light-Emitting Diodes (LED) have come a long way since red low-powered versions were introduced in the early 1970s in calculator, computer, and other electronics displays. They now come in many colors and have become common in automotive uses and have become increasingly popular with motorcyclists. This is because they can produce more light while consuming less power. And if you've ever had to replace your stator, you can appreciate the desire to consume as little electrical power as possible--while maintaining safety and comfort.

In theory, LEDs also last much longer than incandescent bulbs. We shall see. A warm operating environment is known to shorten the life of LEDs and my summers in North Carolina may turn out to be LED killers.

LEDs are much more expensive than traditional lighting on your bike, about ten times more expensive. If you're going to spend hundreds of dollars to upgrade your lights, there are some important details you should know first, and I'm here to share some of those details with you.

Geometry matters

Choose LED "bulbs" according to the direction in which they point their light in relation to the shape of the light housing and socket on your bike. For example, for the two "pancake" style lights I've highlighted in the photo at the start of this article, the kind of LED light shown in the photo at right is the preferred style. This is beacause all of its LED elements point in the direction you want the light directed, namely, straight off the back (or front, whichever the case may be) of your bike.

Both of these sockets are consdered "right angle" because the socket opening is at a right angle to the direction of the desired light beam. You could use an LED "bulb"--a cluster of LEDs on a bulb-shaped core--which I have tried, but it leaves much to be desired as most of the light emitted is directed into the light housing. And, as you might guess, the more LED elements you can pack into the light housing--and facing in the correct direction--the brighter the output. Hence, a unit with 24 LEDs is typically going to be brighter than one with 12, for example. Of course, the 24 element light will also typically cost more.

The LED unit shown, one of the two I purchased, contains 48 LEDs: 1, 7, 16, 24. For a pair, I paid retail: $69.95 at my local Harley dealer. I'm confident you can do better online, but shopping at Ray Price Harley Davidson from time to time offers benefits that sometimes mitigate the higher prices paid, such as chatting with other bikers and picking up helpful tips.

Pay close attention to the connector configuration

The bulbs designed for use in my auxiliary brake/tail lights and the bulbs designed for the turn signal lights look similar but contain at least two important differences: the number of contacts and the position of the locking pins.


Single (left) versus dual contacts (right)
Parallel (left) versus offset (right) locking pins


The auxiliary brake/tail lights take a type 1157 bulb, which uses dual-connectors with offset locking pins.

The turn signals take a 1156 bulb, which uses a single, longer contact with level, or what are referred to as "parallel," locking pins.

These details are critical to know when selecting your LED lights. Ensure the lights you're purchasing have the correct connectors on them. Also note that for the bulb with offset pins, the connector may need to be inserted a specific way, such as the higher pin locking into the front-facing slot, for example. (Remember that the goal is to get a good contact at the base.)

Load stabilizer

LEDs require a narrower range of voltage and current (amps) than do the traditional incandescent lights. At some point in the upgrade process to LED lighting, you will need to add a "signal stabilizer." I supported my local economy by purchasing a Custom Dynamics product at a retail cost of $69.95 plus tax. This power management device connects to your battery and is inserted into the bike's turn signal and brake lighting system using modular Tyco 8-wire connectors under your seat. I installed and initialized it in under 15 minutes, and that includes taking my seat off.

Two more tips

In order to reduce corrosion at the point of contact between the light and the socket, dab a little dielectric grease on each contact point before inserting the bulb. This will help seal out moisture.

Also, Carl at Ray Price Harley Davidson shared this helpful tip with me last week when I purchased the Genesis Flat Style Turn Signal (1156) for my bike last week: add a little silicone gel or caulk on the LED light plate where the screws pass through in order to reduce vibration and hold the plate in place. Look closey at the picture I used of my new lights (above) and you can see the white caulk.

As always, keep the shiny side up!

-The Long Rider